
Rose Restoration — a Washington DC masonry and repointing contractor — explains the difference between mortar types M, S, N, O, and K, and which to use for historic brick, chimneys, foundations, and exterior masonry repair.
47+ years restoring marble, terrazzo, concrete, and natural stone across DC, MD, and VA.
When most homeowners look at a crumbling brick wall or a deteriorating chimney, they assume the bricks are the problem. In reality, the mortar joints between those bricks are usually the first thing to fail—and the first thing that needs expert attention. Mortar is the unsung hero of masonry construction, and it is also the most misunderstood element in masonry repair.
Choosing the wrong mortar type, the wrong color, or the wrong strength doesn’t just look bad—it can cause permanent, irreversible damage to your masonry. Mortar that is harder than the surrounding brick will force moisture and stress into the brick face itself, causing spalling, cracking, and premature deterioration that no amount of future patching can fix.
At Rose Restoration International, we have spent more than 40 years mastering the science of mortar matching. Our crews have worked on historic Federal-era brick townhouses in Alexandria, 1920s Colonial Revival homes in McLean, mid-century commercial buildings in Bethesda, and everything in between. Every project begins with the same discipline: understand the original mortar, then replicate it as closely as humanly possible.
This guide explains everything homeowners in Northern Virginia, Maryland, and Washington DC need to know about mortar types, color matching, sand selection, and what to expect from a professional repointing project. If you have cracked, crumbling, or discolored joints anywhere on your home, this is the place to start.
Why Mortar Matching Matters
Mortar performs two jobs simultaneously: it bonds masonry units together and it acts as a sacrificial, flexible buffer that absorbs movement, moisture, and thermal expansion. That second function is the critical one most people overlook.
Brick, stone, and concrete block expand and contract with temperature changes. They shift slightly as buildings settle. Over decades, these micro-movements accumulate. The mortar joint is engineered to accommodate that movement—to crack and weather so the masonry units themselves do not. A properly specified mortar will outlast the freeze-thaw cycles of a Virginia winter without damaging the brick beside it.
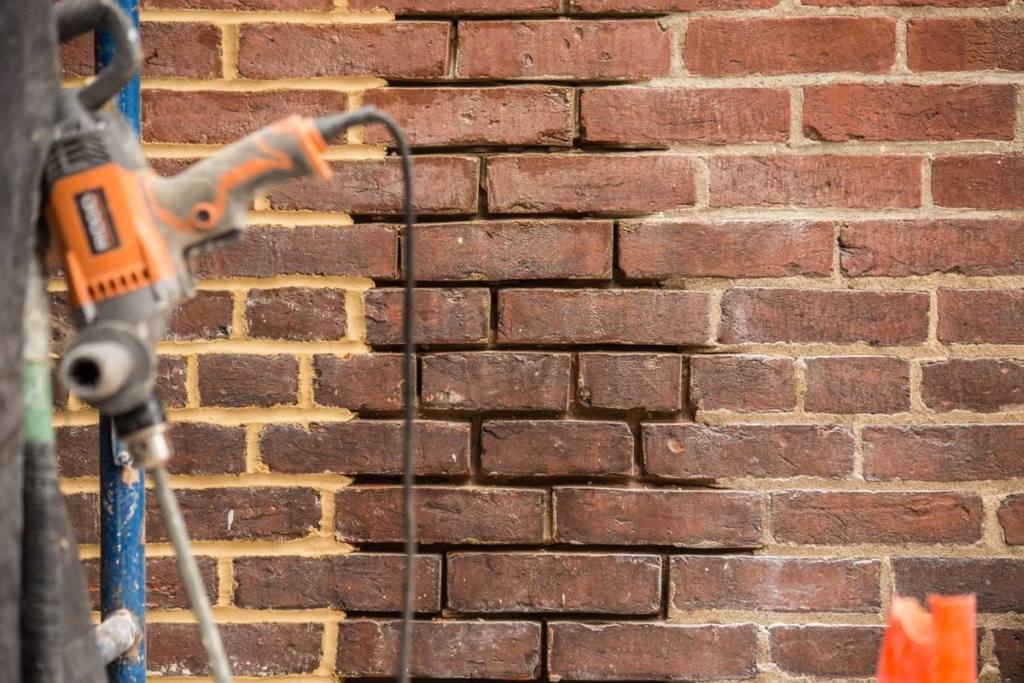
When a contractor installs mortar that is too hard—say, a high-Portland Type S mortar on a soft historic brick that was originally pointed with a lime-putty mix—the rigid mortar refuses to flex. Instead, the force transfers directly into the brick face. You get spalling: the brick surface flakes, pops, and peels. Once spalling begins, it accelerates. Water infiltrates the exposed brick body, freezes, expands, and the damage compounds year after year.
Historic masonry buildings in Virginia and DC are especially vulnerable because pre-1930 brick was often hand-molded, low-fired, and relatively soft. It was designed to be paired with weak, lime-rich mortars. Modern Portland cement mortars are three to five times harder. Using them on historic masonry is one of the most damaging mistakes in the industry—and one of the most common made by inexperienced contractors.
Matching mortar correctly is not optional. It is the difference between a repair that lasts 50 years and one that causes irreparable harm within a decade.
Understanding Mortar Types: N, S, O, M, and K
The American Society for Testing and Materials (ASTM) classifies mortar into five standard types based on compressive strength, bond strength, and flexibility. Each type is appropriate for specific applications. Using the wrong type is a common and costly mistake.
Type N — General Purpose (Most Common for Above-Grade Residential)
Type N mortar has a compressive strength of approximately 750 psi. It is the most versatile and widely used mortar for above-grade exterior applications, including chimneys, garden walls, and standard residential repointing. Type N balances durability with enough flexibility to handle normal building movement. It is the correct choice for most Northern Virginia homeowner repointing projects.
Type S — High Bond Strength (Below-Grade and Structural)
Type S achieves compressive strengths around 1,800 psi. It is specified for below-grade applications, retaining walls, foundations, and anywhere the masonry is subject to significant lateral pressure or soil contact. Type S is also used in areas with high seismic risk. It is too rigid for most historic above-grade masonry repairs.
Type O — Soft Mortar (Interior and Historic Above-Grade)
Type O has a compressive strength of only about 350 psi. It is appropriate for interior non-load-bearing applications and, critically, for historic exterior masonry where the brick is soft and the original mortar was lime-rich. Many pre-1940 homes in the DC area require Type O or a custom lime-based mix. Type O allows the mortar to flex and sacrifice itself before damaging aged brick.
Type M — Very High Strength (Foundations and Hardscaping)
Type M mortar reaches 2,500 psi or more. It is reserved for foundations, manholes, retaining walls below grade, and masonry in contact with earth. Its extreme hardness makes it unsuitable for any residential repointing application above grade.
Type K — Historic Restoration Only (Very Soft)
Type K is rarely used outside of historic preservation work. With compressive strength below 75 psi, it is extremely soft and sacrificial. It is appropriate only for the most fragile historic masonry—18th and early 19th century structures where even Type O would be too rigid. Rose Restoration uses Type K on select preservation projects in Old Town Alexandria and the DC historic districts.
Choosing the correct type requires examining the existing masonry, testing or estimating the original mortar strength, and understanding the application. This is not a decision that should be made at the hardware store.
How We Match Mortar Color
Structural correctness is only half the challenge. Color matching is the craft that separates a professional restoration from a patchwork repair. A structurally sound but visually mismatched repoint is immediately obvious and diminishes both curb appeal and property value.
Rose Restoration’s color matching process begins with sampling. We take a small sample of the existing mortar joint—ideally from a sheltered location where the original color has not been bleached by UV or stained by moisture. We examine the sample under magnification to identify the sand type, grain size, and any pigmentation.
Sand selection is the single biggest factor in final joint color. Sand accounts for roughly 70–75% of the mortar volume. Yellow sand produces a warm tan joint. Gray sand produces a cooler, stone-like appearance. White silica sand produces very light joints common in 20th century construction. We source regionally appropriate sand to match the original material.
Portland cement ratio directly affects color: more Portland produces darker, grayer joints. We adjust the mix proportions to match the original appearance as closely as possible. More lime in the mix lightens the color and affects how it weathers over time—lime-rich mortars often develop a bright white surface patina that is characteristic of historic masonry.
Pigment additives are used sparingly when natural aggregates alone cannot achieve a close enough match. We use iron oxide pigments rated for exterior masonry use. The pigment must be mixed precisely by weight—even small variations produce inconsistent results across a large project.
We always produce test panels and allow them to cure for at least 28 days before final approval. Wet mortar looks very different from cured mortar. Color-matching fresh mortar to existing weathered joints requires experience and a calibrated eye developed over years of work.
Sand Selection and Texture Matching
Most homeowners never think about sand. Experienced masonry contractors think about almost nothing else. The sand in a mortar joint determines not just color but texture, workability, and long-term porosity.
Coarser sand produces a rougher joint surface that reflects light differently from fine sand. Older buildings often used naturally deposited river sand with rounded grains and inconsistent sizing. Modern construction typically uses washed manufactured sand with angular grains. The two look completely different at close range, even if they are the same color.
Regional geology matters. Sand from the Potomac River drainage basin has a characteristic blend of quartz, feldspar, and dark minerals that gives older DC-area masonry its distinctive warm gray-tan color. Imported sand from other regions will not match—even if it looks similar in a bag. Rose Restoration maintains relationships with local and regional sand suppliers so we can source historically appropriate materials for projects throughout Northern Virginia, Maryland, and DC.
For historic preservation projects, we sometimes perform laboratory analysis of original mortar samples to determine aggregate gradation and composition. This is standard practice for projects subject to SHPO review or Secretary of the Interior’s Standards compliance. Even for residential work, the extra effort of sourcing the right sand pays off in a repair that becomes invisible over time.
Common Mortar Failures Homeowners Should Watch For
Knowing what to look for can help you catch masonry problems before they become expensive structural issues. Here are the most common signs of mortar failure in residential masonry:
- Crumbling or powdering joints: Mortar that crumbles when you press it with a finger or a key is past its service life. It no longer provides a meaningful weather barrier. Repointing is overdue.
- Hairline cracks along joint lines: These often indicate differential movement between the mortar and the masonry units, or mortar that has lost its flexibility. Pay particular attention to vertical cracks, which can indicate foundation movement or settlement.
- Mismatched repair patches: Gray Portland cement patches on tan or buff-colored historic mortar are a red flag. They indicate previous repairs made with the wrong material—and often signal that harder mortar has been applied to softer masonry, setting up future spalling.
- Efflorescence (white staining): White mineral deposits on the face of brick or stone indicate moisture is moving through the masonry and depositing salts on the surface. Failed mortar joints are the most common entry point for that moisture.
- Spalling brick faces: If the face of your brick is flaking or popping off, harder-than-appropriate mortar is often the cause. The damage to the brick itself is permanent; all you can do is stop the process by removing the incorrect mortar and replacing it with a compatible mix.
- Gaps or voids: Any visible gap between mortar and masonry units is an open water channel. Even small voids will admit enough moisture to cause significant freeze-thaw damage over a single Virginia winter.
If you observe any of these conditions on your chimney, exterior walls, steps, or foundation, contact Rose Restoration for a free assessment. Early intervention is always less expensive than deferred maintenance.
The Repointing Process for Residential Masonry
Professional repointing is a multi-stage process that, when done correctly, should last 25 to 50 years. Here is what Rose Restoration’s residential repointing process looks like from start to finish.
- Assessment and mortar analysis: We inspect the masonry visually and, where appropriate, collect samples for color and composition analysis. We identify any areas of structural concern beyond routine repointing.
- Joint preparation: Old mortar must be removed to a minimum depth of 3/4 inch—ideally 1 inch—to ensure adequate bond depth for new mortar. On historic masonry, we use hand chisels and oscillating tools rather than angle grinders, which can damage brick edges and produce joints that are too wide. This is slow, careful work.
- Joint cleaning: After removal, joints are blown out with compressed air and brushed to remove dust and loose particles. A clean, dust-free surface is essential for bond strength.
- Mortar mixing: We mix mortar in small batches to ensure consistent color and workability. We never use pre-mixed mortar from a bag for color-critical work. All components are measured by weight.
- Joint packing: Mortar is packed into the joint in layers (lifts), not applied all at once. Each lift is approximately 1/4 inch thick and is allowed to set slightly before the next layer is applied. This prevents shrinkage cracking and ensures full joint density.
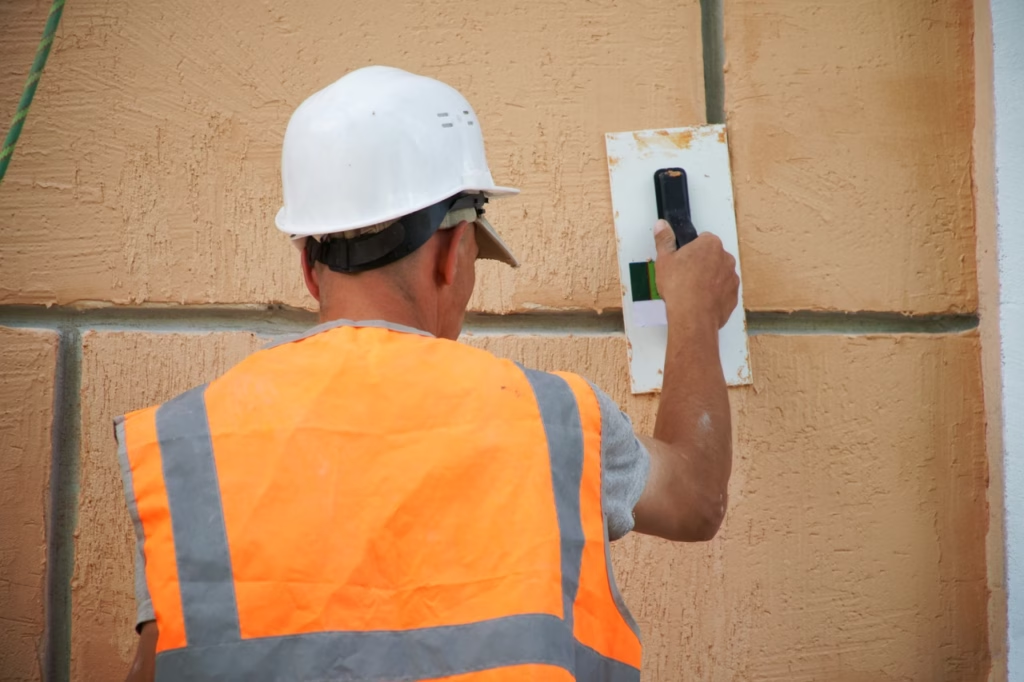
- Joint tooling: Before the mortar fully hardens, joints are tooled to match the original joint profile—typically concave, struck, or flush depending on the building. Tooling compresses the mortar surface, improving weather resistance and matching the original appearance.
- Curing and protection: Fresh mortar must be protected from direct sun, rain, and freezing temperatures during the initial cure period. We use burlap or plastic sheeting as appropriate. Full strength develops over 28 days.
For a deeper introduction to residential repointing, see our guide: Understanding Brick Repointing and Masonry Repair: A Homeowner’s Guide to Stairs, Chimneys, and Exterior Masonry.
Custom Mortar Matching Services
Need mortar matched for a repointing project? Our team analyzes existing mortar composition and creates custom blends that match color, texture, and strength. Serving historic and modern buildings across the DC metro.
If your project involves commercial or government masonry, or if you are a general contractor looking for a qualified masonry subcontractor, see: What General Contractors Should Know About Repointing, Mortar Matching, and Masonry Restoration Protocols.
Frequently Asked Questions
How much does brick repointing cost?
Residential repointing costs vary significantly depending on the scope, accessibility, and mortar matching requirements. A straightforward chimney repoint for a single-family home in Northern Virginia typically ranges from $800 to $2,500. Full exterior wall repointing on a two-story brick home can range from $5,000 to $25,000 or more depending on the square footage and complexity. Historic mortar matching adds cost because of the additional labor in material sourcing, sample analysis, and test panel preparation. Rose Restoration provides detailed written estimates after a free on-site assessment—we never quote repointing from photos alone, because the condition of the existing mortar must be evaluated in person. Call us at (703) 327-7676 to schedule your assessment.
How long does mortar last between repointing?
High-quality mortar installed in the right type and with proper joint preparation typically lasts 25 to 50 years before repointing is needed. However, the lifespan varies significantly based on exposure, mortar type, and whether previous repairs were done correctly. Chimneys and north-facing walls—which hold moisture longer—tend to deteriorate faster than sheltered or south-facing masonry. Mortar that was installed with too little Portland cement, or that was applied without adequate joint preparation, may fail in 10 to 15 years. Annual visual inspections are the best way to catch early-stage deterioration before it becomes a major repair.
Can I repoint my own brick?
DIY repointing is possible for very small, low-visibility repairs—a single damaged joint on a garden wall, for example. But for chimneys, historic masonry, or any significant area of exterior wall, we strongly advise against it. The risks are substantial: using the wrong mortar type can cause spalling that destroys the brick face, incorrect joint preparation can prevent the new mortar from bonding, and color mismatches are nearly impossible to correct once the mortar has cured. The cost of repairing DIY repointing mistakes frequently exceeds the cost of having the job done professionally from the start. For anything beyond a minor cosmetic touch-up, call a qualified masonry contractor.
What happens if the wrong mortar type is used?
The consequences range from cosmetic to catastrophic depending on the degree of mismatch and the vulnerability of the masonry. A mortar that is moderately too strong may simply look wrong and crack prematurely as the building moves. A mortar that is substantially harder than the brick—the most common error on historic buildings—will cause the brick face to spall. As temperature changes force movement through the masonry assembly, the rigid mortar does not flex; instead, it levers against the brick face, popping it off in layers. This damage is permanent. Spalled historic brick cannot be repaired, only replaced—and matching replacement brick for a 100-year-old building is difficult and expensive. Removing hard mortar from historic masonry without damaging the brick requires painstaking hand-tool work and often costs more than a correct original repoint would have.
How do you match mortar color on old brick?
Color matching old mortar requires analyzing the existing joint material to understand its composition, then reverse-engineering a new mix that will cure to the same appearance. We examine sand color, grain size, and texture under magnification, estimate the Portland-to-lime ratio from hardness and color, and add iron oxide pigments only when natural aggregate selection alone cannot achieve a close match. We produce sample panels and cure them for 28 days before comparing to the existing work—because wet mortar color is not a reliable guide to cured color. For historic preservation projects, we can arrange laboratory analysis of mortar samples to determine aggregate gradation and mineral composition with precision.
Does Rose Restoration do residential masonry repair near me?
Yes. Rose Restoration International serves homeowners throughout Northern Virginia, Maryland, and the Washington DC metro area. Our service area includes Fairfax, Alexandria, Arlington, Falls Church, McLean, Vienna, Reston, Herndon, Leesburg, Loudoun County, Prince William County, Montgomery County MD, Prince George’s County MD, and the District of Columbia. We work on chimneys, exterior brick walls, stone foundations, concrete block, brick steps, retaining walls, and historic masonry of all types. Call us at (703) 327-7676 or visit our contact page to request a free assessment. We also refer homeowners with masonry problems on government or commercial buildings to our article on diagnosing mortar failure in chimneys and brick stairs.
Schedule a Free Masonry Assessment
Mortar failure is a slow, cumulative problem—and the longer it goes unaddressed, the more expensive the repair becomes. Crumbling joints that cost a few hundred dollars to repoint today can lead to spalled brick, water intrusion, and structural damage that costs thousands to remediate tomorrow.
Rose Restoration International has been matching mortar and restoring masonry in the Northern Virginia, Maryland, and DC area for more than 40 years. We bring the same discipline to a residential chimney repoint that we bring to a federal historic preservation project: precise mortar analysis, correct type selection, quality aggregate sourcing, and meticulous installation.
Call us at (703) 327-7676 or use the button below to request a free, no-obligation assessment. We will evaluate your masonry, identify any areas of concern, and provide a detailed written estimate. There is no pressure and no guesswork—just honest advice from experienced masonry professionals who have seen every type of mortar failure in the region.

christos
Rose Restoration International — 47 years restoring surfaces across the capital region.
Keep reading
Restore. Don't replace.
47 years of polishing marble, terrazzo, concrete, and tile across Washington DC, Northern Virginia, and Maryland. IMF, Four Seasons, Smithsonian, and the Virginia State Capitol trust us — you can too.